Your website, your calendar, your truck: the step-by-step guide
Six steps of a few minutes each. Everything is in your dashboard, under “Share”.
In the examples, {slug} stands for your listing's address. Sign in to see your own codes, ready to copy.
-
Step 1
“Share” in 30 seconds
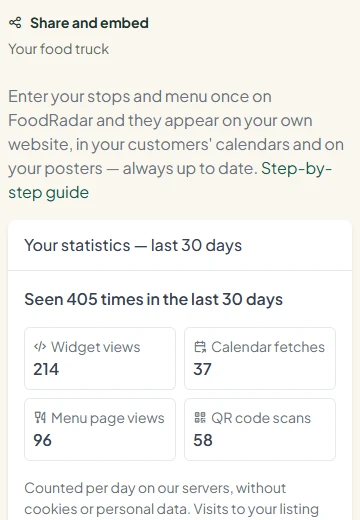
In your dashboard, every listing has a “Share” button. That page gathers the widget for your website, the calendar link, the menu page, the QR codes and your statistics.
-
Step 2
The widget on your website
Copy this code and paste it where your times should appear. It updates itself: you never touch it again.
Where to paste it
- WordPress: add a “Custom HTML” block and paste the code. On free WordPress.com, use the iframe code.
- Wix: Add → Embed Code → “Embed HTML”, then paste the code.
- Squarespace: add a “Code” block and paste the code.
- Jimdo: add a “Widget/HTML” element and paste the code.
If your website refuses scripts
Some websites accept no script (free WordPress.com, a few site builders): the widget does not appear. Paste this iframe code instead — the same content, in a frame of fixed height.
-
Step 3
The calendar for your customers
Customers subscribe once: every new stop and every cancellation then shows up in their calendar without them doing anything. Put the link on your website or send it to your regulars.
- iPhone, iPad, Mac (Apple Calendar): the “webcal” link opens the subscription directly.
- Google Calendar: “Other calendars” → “+” → “From URL”, then paste the calendar link.
What your customers see: one event per stop, with the time, the address and a link to your listing.
-
Step 4
Your page
No website? “My page” gives you one: a page in your name at a short address, with where you are today, your next stops, your menu and how to reach you — without FoodRadar's navigation. Switch it on under “Share and embed”, then put the link wherever your customers look for you:
- in your Instagram bio — the one clickable link on a profile;
- in your Google business profile, “Website” field;
- in your WhatsApp status and profile;
- on the QR code on your truck: it leads to your page as soon as the page is on.
The address looks like this:
foodradar.ch/{slug} -
Step 5
Instagram and Facebook
Put your menu page link in your Instagram bio and in the “About” section of your Facebook page: it always shows today's menu, in the phone's language.
For a story: add the PNG image of your QR code, or a “Link” sticker to the menu page.
-
Step 6
The QR code on the truck
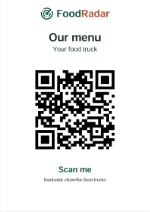
Download the A6 card (PDF) under “Share” → “QR codes”. One scan opens today's menu, in the customer's language.
- Print on matte paper — gloss reflects and scans badly — with a code at least 8 cm wide.
- Stick it at eye level, next to the counter or the queue, out of the rain (a matte plastic sleeve is enough).
- Keep the white margin around the code: without it, phones cannot read it. Do not trim it to the edge and stick nothing over it.
-
Step 7
Your statistics
Under “Share”, four counters over the last 30 days:
- Widget views — how often your times or menu widget appeared on your website.
- Calendar fetches — how often subscribed calendars re-read your times. A calendar re-reads several times a day: this is not a number of people.
- Menu page views — openings of your menu page link (Instagram, WhatsApp…), QR codes not included.
- QR code scans — every scan of your card or of a downloaded QR code.
- My page — visits to your page, QR code scans not included.
Counted per day on our servers, without cookies or personal data. Visits to your listing on FoodRadar are not counted here.
A question, or help to set it up? Write to us: info@foodradar.ch